This was one of those jobs I told myself I would never do again.
So naturally, when I wanted to change out the cheap factory speakers, I thought, “Why not?”
The packages of sound deadening, available now as an Amazon Basics product, kept taunting at me until I did some rudimentary math (which is, of course, always wrong) and calculated that I should add two boxes of the 18″x32″ pieces to my cart when I purchased the speakers.
I figured I could always return them.
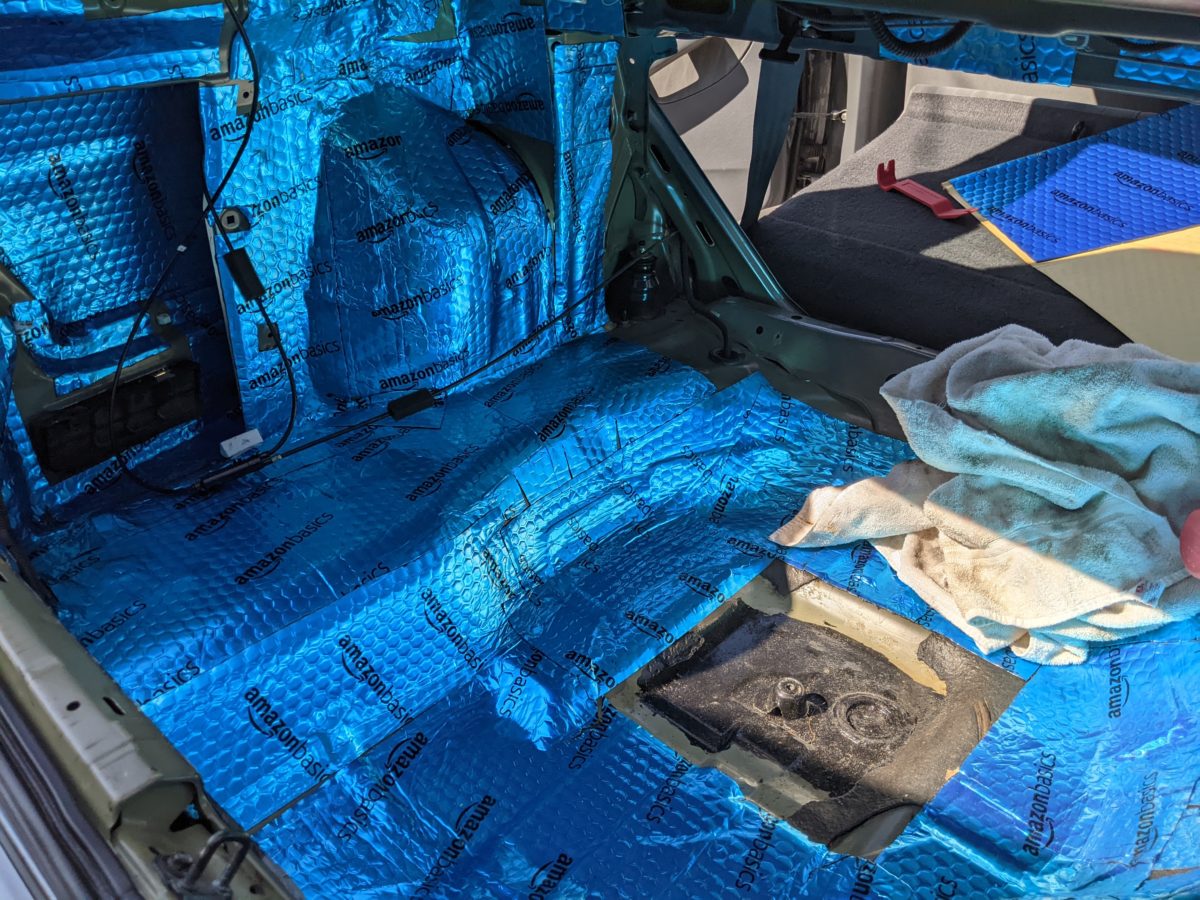
But it didn’t work out that way, as you see in the photo. I had previously done El Borrego with sound deadening sheets from Second Skin Audio (the Damplifier Pro), with some mass-loaded vinyl (Luxury Liner Pro) for specific areas I wanted to add sound blocking. That was not an easy job, and in that case, I had removed the seats and carpeting to do a full treatment. I think I had El Borrego parked for a month while I worked on it, as I had the interior in random stages of disassembly at that point.
I haven’t gotten to that point yet with Earl Burner, but I did go so far as to completely line the trunk area, the rear tire wells (inside, of course), and all four doors. In addition to patches on the package shelf (where I swapped out the speakers), I added some patches to the hood (in the openings between the bracing) as well as the trunk lid. Having done that, I’ve used all but three of the 18 sheets of sound deadener I received. If I decide to do the interior (except for the firewall), I’ll need another box of 18″x32″ sheets.
I took it on a couple of preliminary runs. On the surface streets, I do hear a difference. At highway speeds, though, I can tell there is still work to be done. The rear half of the car obviously has the bulk of the treatment, and the doors are noticeably quieter. I may supplement the fender well treatment with some rubberized undercoating applied outside, once I first treat the areas with POR15. And might attempt to do a few spots on the firewall with the same undercoating from the engine bay side, if there is room.
Comparison
How does the Amazon Basics compare to the Damplifier Pro? The latter is definitely a heavier material with a heavier foil backing, and it does not have the “bubbles” stamped into it, which gives it a higher mass. The thickness is nearly the same. But in practice the Amazon Basics still provides some sound deadening, much needed in a car that had almost none. For a budget build, I would probably go with something similar to the Amazon Basics again, but would still stick to the Second Skin Audio products for more important applications.
The nice thing about the bubbles is that it makes it easier to cut the product in straight lines. I wish the Second Skin product had some sort of regular markings embossed into it, or printed on the backing paper, to help with this.
Tips
Get some shears. You’ll need something thick and easy to operate so the dampener sheets are easier to cut through. I found using a knife to be too difficult.
Get a couple of rollers, preferably with ball bearings to make rolling easier. The Second Skin shipped with one of the old fashioned wooden seam rollers that we used to use on wallpaper–it held up well until I finally wore it out, and it was always a little difficult to roll at times.
You may want to wear gloves–the foil on these products can give some slices and cuts if you’re not careful.
Dampening sheets are for just that purpose–dampening. They will not block sound and noise like mass-loaded vinyl. What they do is cut down on the resonance of the sheet metal in the car by adding mass and, due to it being a “gummy” sort of material, also absorbs some of those resonances as well. It makes a big difference when you knock on a panel that has been treated–you get a dull “thunk” underneath your knuckles.
Surface prep is everything. Get yourself some isopropyl alcohol and a spray bottle, and mix it 50/50 with water. Find some rags or microfiber towels and thoroughly wipe down each surface twice, or even more if you are cleaning the bottom of a trunk or tire well, or the bottoms of the insides of your doors.
Cut your pieces to fit (remember the old saying–measure twice, cut once), and save all of your scraps. As you work on irregularly shaped areas, you’ll find those scraps will sometimes fit perfectly.
100% coverage is good, but even 90% coverage on outside panels is effective, so don’t worry too much if you leave a couple of small areas bare.
In areas like doors, where there are two metal layer (the outer skin, and the inner structure), I tend to heavily cover the outer skin, and also apply some deadening to the inner structure.
Watch your holes! If you have removed body panels, wiring harnesses, etc., there are places where fasteners need to attach, and other holes or flat areas might be places where a panel rests but is not fastened. Also watch for where any reinforcing ribs fall on the trim panels, as adding even a small amount behind them can prevent them from fitting back to the body properly. Also, for the inner structures of things like doors, certain access holes need to be kept open for servicing or parts replacement–always keep those open. If you need any dampening on an inner structure, see if you can apply it from behind, where no panel attaches and out of the way of mechanisms like window and door lock actuators. Finally, never block any drainage holes. When in doubt, trim it out….or leave it out entirely.
Put some muscle into it! Once you have your dampener piece in place, press it firmly so it sticks. Then, once you’ve applied other pieces around it, use your rollers to press down and make it stick to the panel. Hopefully you’re doing this on a warm day or better yet, outdoors in the sun–that heat will really help the pieces adhere nicely. If you can’t reach some areas with your rollers, use a set of trim removal tools, the sturdier the better–they have plenty of curves and points to slip into places a roller can’t reach.
Do not apply over rust! If you need to (like I did in the photo above), treat an area with a rust treatment like POR-15. I had a small leak in the trunk and the trunk floor beneath the spare tire fastener had a bit of scale on it. Let the POR-15 dry overnight in a warm area, and you should be good by the next day.
If all went well, your reassembly of your interior should go smoothly. While you’re at it, be sure you have replacement clips on hand–they can be broken while disassembling the interior. They are now cheap and readily available online, in kits that offer just about anything imaginable. Fasten them back on properly!